ADA requirements for bathrooms explained starts with a simple premise: a restroom must be usable by people with different mobility, reach, balance, vision, and dexterity needs without unnecessary barriers. In practice, that means dimensions, clearances, fixture heights, turning space, grab bar placement, hardware operation, and signage are all governed by technical rules. For owners, contractors, architects, and facility managers, those rules matter because bathrooms are among the most common sources of accessibility complaints, failed inspections, and costly retrofits. I have worked through bathroom compliance reviews in offices, restaurants, clinics, and multifamily properties, and the same pattern appears repeatedly: small layout decisions made early determine whether the final room works well or requires demolition later.
The ADA, or Americans with Disabilities Act, is a federal civil rights law that prohibits discrimination based on disability. When people talk about ADA bathroom requirements, they usually mean the 2010 ADA Standards for Accessible Design, which set scoping and technical criteria for accessible toilet rooms and bathing facilities in many public accommodations, commercial facilities, and state or local government buildings. Those standards often interact with ICC A117.1, the International Building Code, and state accessibility codes, so compliance is not just about one document. The core objective is consistent usability. An accessible bathroom is not simply a larger restroom; it is a space designed so a wheelchair user can enter, maneuver, transfer, reach controls, wash hands, and exit with reasonable independence and safety.
This matters operationally as much as legally. A compliant layout reduces injury risk, broadens customer access, supports aging users, and helps employers accommodate workers and visitors. It also improves everyday usability for parents with strollers, people recovering from surgery, and anyone who needs more room and clearer hardware. Because this article is the hub for ADA compliance and guidelines within accessibility and mobility solutions, it covers the fundamental requirements, common mistakes, measurement basics, and upgrade priorities that shape compliant bathroom design. If you understand the principles here, you can evaluate a restroom plan, ask better questions of your architect or contractor, and identify when a specialist review is necessary before construction begins.
What the ADA actually requires in bathroom design
The ADA does not require every bathroom fixture in every building to be accessible, but it does require a specified number of accessible elements based on building type, occupancy, and fixture count. For toilet rooms, the standards address accessible routes, door maneuvering clearances, turning space, toilet compartments, lavatories, mirrors, dispensers, operable parts, and signage. In larger facilities, there may need to be ambulatory accessible compartments in addition to wheelchair accessible stalls. In bathing rooms, requirements extend to transfer showers, roll-in showers, bathtubs, seats, controls, and hand-held shower sprays.
Two concepts drive most bathroom compliance decisions: clear floor space and reach range. A wheelchair user needs floor area to approach fixtures, position alongside or in front of them, and turn within the room. The familiar turning circle is 60 inches minimum, though a T-shaped turning space can also comply. Reach ranges determine where dispensers, flush controls, hooks, hand dryers, and faucets can be placed. If a soap dispenser is mounted beautifully but outside allowable side reach or forward reach limits, the bathroom can still fail accessibility review even if the room feels spacious.
Another frequent point of confusion is the difference between ADA compliance and universal design. ADA establishes minimum legal requirements; universal design often goes further by creating spaces that work better for a broader range of users. For example, a compliant sink may technically meet knee clearance, but a sink with better insulated pipes, easier faucet actuation, and more generous side clearance will perform better in real use. The legal standard is the baseline, not the ceiling.
Accessible routes, doors, and maneuvering clearances
An accessible bathroom begins before the user reaches the toilet room door. There must be an accessible route to the restroom, typically at least 36 inches wide, without steps, abrupt level changes, or inaccessible thresholds. Door openings generally must provide a minimum 32 inches of clear width when the door is open 90 degrees. In renovation work, I often see plans that show a nominal 34-inch door and assume that solves the issue, but frame thickness, hardware, and door stop details can reduce actual clear opening below the requirement.
Door maneuvering clearance is just as important as opening width. A user approaching from the latch side needs enough wall and floor area to pull or push the door without backing into obstacles. Pocket doors and power-assisted operators can solve difficult layouts, but the surrounding clearances still need to be reviewed carefully. Hardware must be operable with one hand and should not require tight grasping, pinching, or twisting of the wrist. Lever hardware is standard because round knobs are a common failure point.
Thresholds at bathroom doors should be low and beveled where required. Closing speed and opening force also matter. A door that technically clears width requirements but takes too much force to open can still create an access barrier. In existing buildings, relocating a closer, adjusting spring tension, or changing the hardware set is often one of the fastest low-cost improvements a facility can make.
Toilet clearances, stall layouts, and grab bar placement
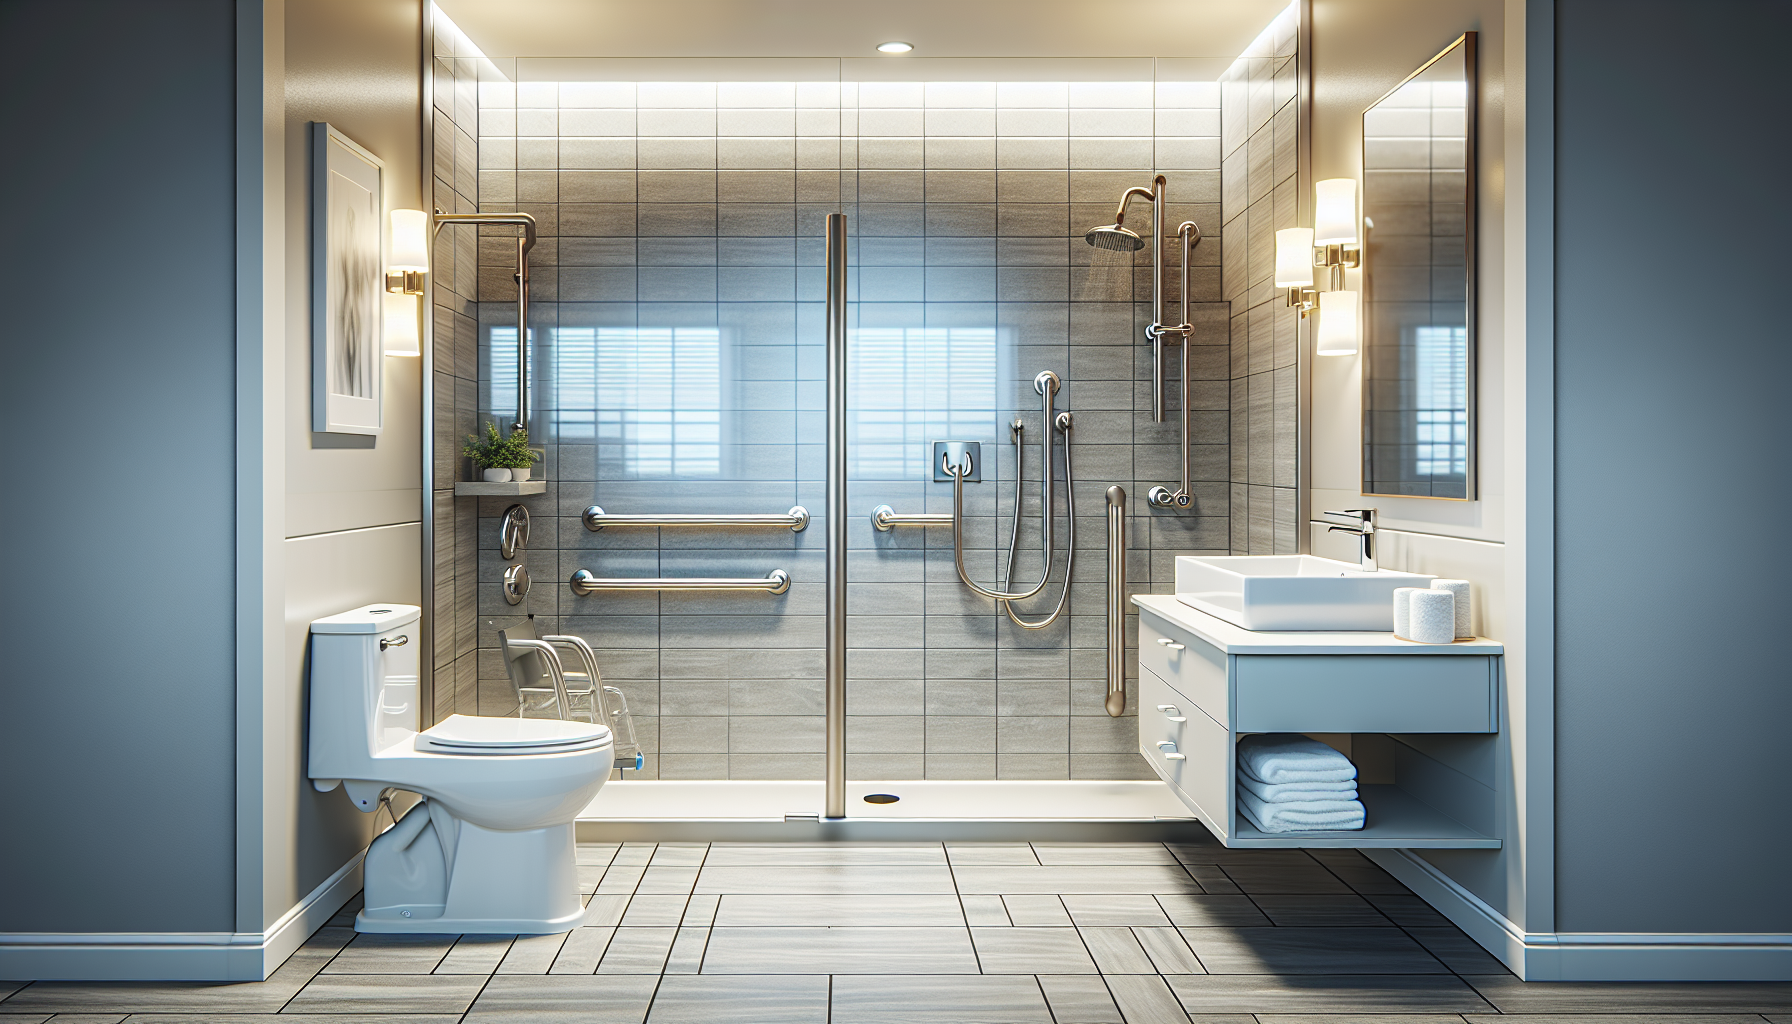
The accessible water closet area is where dimensions become highly specific. The centerline of the toilet must be 16 to 18 inches from the adjacent side wall or partition. The seat height must be 17 to 19 inches above the finished floor. There must be clear floor space around the toilet to support transfer, and in wheelchair accessible compartments, the stall width and depth must align with whether the fixture is wall-mounted or floor-mounted. These are not cosmetic details. A toilet set even an inch or two off center can compromise transfer and grab bar use.
Grab bars are among the most inspected bathroom elements because incorrect placement is common. The side wall grab bar and rear wall grab bar must be installed at prescribed lengths and mounting heights, generally 33 to 36 inches above the floor to the top of the gripping surface. They also need proper structural backing. I have seen many remodels where bars were added after finishes were complete, only to discover the wall lacked reinforcement and the installation could not safely support loading. Compliance requires both correct location and functional installation.
Stall doors need equal scrutiny. Door swings, latch accessibility, toe clearance, and approach space all affect usability. In multi-user restrooms, ambulatory accessible compartments serve people who walk but need grab bars on both sides. These are often omitted when designers focus only on wheelchair stalls. The standards anticipate different mobility patterns, so a compliant restroom usually includes a mix of accessible features rather than a single enlarged compartment.
| Bathroom element | Common ADA benchmark | Frequent field mistake |
|---|---|---|
| Door clear opening | 32 inches minimum | Nominal door size assumed equal to clear opening |
| Turning space | 60 inches minimum | Trash cans or baby stations intrude into clearance |
| Toilet centerline | 16 to 18 inches from side wall | Fixture set too far from wall after rough-in change |
| Toilet seat height | 17 to 19 inches | Residential-height fixture specified in commercial project |
| Grab bar height | 33 to 36 inches | Bars mounted to tile pattern instead of measured layout |
| Lavatory rim height | 34 inches maximum | Decorative bowl raises rim above allowable height |
| Mirror height | Bottom edge 40 inches maximum above floor | Mirror aligned with nonaccessible vanity elevation |
Lavatories, mirrors, and accessory reach ranges
Accessible lavatories must allow a forward approach by a wheelchair user. That means knee and toe clearance below the sink, a maximum rim or counter height of 34 inches above the finished floor, and insulated or otherwise protected pipes and sharp surfaces underneath. Vessel sinks are a recurring source of noncompliance because they may look upscale while pushing the rim height beyond the limit or reducing usable knee space. Wall-hung lavatories or carefully detailed counters are usually more reliable in accessible restrooms.
Faucets and operable parts at sinks must be usable without tight grasping, pinching, or twisting. Lever handles, sensor-activated faucets, and push controls can comply if they are within reach range and do not require sustained force. Automatic fixtures are helpful, but they must function consistently. Poorly calibrated sensors frustrate users and can create practical barriers even when the hardware appears compliant on paper.
Mirrors, soap dispensers, paper towel dispensers, hand dryers, coat hooks, and sanitary product dispensers all need careful placement. The bottom edge of the reflecting surface on a mirror above a lavatory should be no more than 40 inches above the floor. Accessories mounted too high are one of the most common inspection failures because teams often coordinate them late, after tile and millwork are complete. In real projects, I recommend dimensioning every accessory on the elevation drawings instead of leaving placement to field discretion. That single step prevents many avoidable corrections.
Bathing facilities, family restrooms, and special-use bathrooms
ADA bathroom requirements extend beyond standard toilet rooms. Hotels, gyms, hospitals, dormitories, and assisted living environments may include showers or tubs that need accessible configurations. Transfer showers, standard roll-in showers, and alternate roll-in showers each have distinct dimensional requirements for seat placement, control location, threshold treatment, and clear floor space. Hand-held shower sprays on hoses, reinforced walls for grab bars, and controls within accessible reach ranges are standard features in compliant installations.
Family or assisted-use restrooms are often the best way to improve access in smaller buildings because they provide privacy and more flexible maneuvering room. A well-designed single-user restroom can simplify compliance by reducing partition constraints and allowing straightforward turning clearances. However, single-user layouts still need compliant door swings, toilet positioning, lavatory clearances, and accessory heights. Simply labeling a room as family accessible does not make it compliant.
Special-use bathrooms require extra coordination. In healthcare settings, clinical needs may affect sink type, clearances, and privacy controls. In schools, age and grade level can intersect with accessibility and plumbing code requirements. In residential common areas, Fair Housing Act obligations may apply alongside accessibility standards. This is why bathroom compliance should be reviewed in context of the facility type, not as a one-size-fits-all checklist.
Common compliance mistakes in renovations and new construction
Most bathroom accessibility failures are predictable. The first is treating dimensions as approximate. ADA measurements are not conceptual targets; they are enforceable criteria. A contractor who shifts a wall to accommodate plumbing, a tile installer who centers grab bars visually, or a millworker who changes countertop thickness can create a chain reaction that eliminates compliance. Field verification matters because finished dimensions, not design intent, determine the outcome.
Another major mistake is allowing accessories or maintenance items to occupy required clear floor space. Trash receptacles, diaper changing stations, cleaning carts, and freestanding air fresheners routinely intrude into turning areas or transfer zones. I have also seen compliant restrooms become noncompliant after occupancy because a paper towel unit was relocated for convenience or a storage cabinet was added behind the door. Accessibility is an operational issue, not only a design issue.
Signage errors are also common. Accessible toilet rooms need proper identification with tactile characters and Braille mounted at the correct location, typically on the latch side of the door. Directional signs may be required where not all restrooms are accessible. In multi-stall restrooms, fixture count, stall mix, and route continuity must all work together. A technically compliant stall at the end of an inaccessible path does not solve the problem.
How to evaluate and improve an existing bathroom
The best way to assess an existing restroom is through a measured accessibility audit. Start with the route, entrance, and door hardware. Then verify turning space, fixture heights, toilet location, stall dimensions, grab bar placement, sink knee clearance, mirror height, and accessory reach ranges. Use a tape measure, level, and clear checklist tied to the applicable standards. Many teams rely on smartphone photos marked with dimensions so designers, owners, and contractors can review existing constraints together before selecting solutions.
When full reconstruction is not feasible, prioritize changes that remove the most serious barriers. Replacing knobs with levers, lowering accessories, insulating sink pipes, adjusting door closers, adding compliant signage, and installing correctly located grab bars can materially improve usability. Larger interventions such as moving plumbing rough-ins, widening doors, or reconfiguring partitions may be necessary when core clearances fail. These projects cost more, but they are often cheaper during planned renovations than after a complaint or failed inspection.
For reliable results, coordinate accessibility review with code analysis, plumbing layout, and finish selections from the earliest design stage. Ask for dimensioned plans and interior elevations that show all accessories, not just primary fixtures. Confirm whether federal standards, local code amendments, or owner-specific policies create stricter requirements. If your facility serves the public or employees, an accessibility consultant or experienced architect can identify issues before construction documents are issued. That upfront review is usually the least expensive part of the entire process.
ADA requirements for bathrooms explained in practical terms comes down to this: compliance depends on precise measurements, coordinated layouts, and a clear understanding of how people actually use the room. Doors, turning space, toilets, grab bars, lavatories, mirrors, accessories, showers, and signs all have to work together. The benefit is not only avoiding legal exposure. A compliant bathroom is safer, easier to use, and more welcoming for customers, tenants, patients, staff, and guests. It supports independence with details that many users notice immediately, even when others overlook them.
As the hub page for ADA compliance and guidelines within accessibility and mobility solutions, this article establishes the fundamentals you need before tackling specialized topics such as ADA shower requirements, grab bar installation details, restroom signage rules, accessible sink specifications, and renovation checklists. Use these principles when reviewing plans, auditing existing bathrooms, or preparing a capital improvement project. Measure carefully, verify against the applicable standards, and involve qualified professionals early. If you are planning a restroom upgrade, start with an accessibility assessment and build every decision from that baseline.
Frequently Asked Questions
What does ADA compliance in a bathroom actually mean?
ADA compliance in a bathroom means the space is designed and built so people with disabilities can use it safely, independently, and with dignity. That includes individuals who use wheelchairs or walkers, people with limited reach or grip strength, and those with visual or balance impairments. In practical terms, compliance is not just about having one grab bar or a wider door. It involves a coordinated set of technical requirements covering clear floor space, turning radius, accessible routes, toilet compartment dimensions, sink and mirror heights, faucet controls, operable hardware, and required signage.
The Americans with Disabilities Act sets accessibility expectations for many public and commercial spaces, and bathrooms are one of the most closely scrutinized areas because they are essential, frequently used, and highly regulated. A compliant restroom must allow a person to enter, maneuver, transfer to fixtures, operate controls, and exit without unnecessary barriers. If one part of the room is technically compliant but another element blocks access, the restroom may still fail overall accessibility standards.
It is also important to understand that ADA bathroom requirements generally apply to places of public accommodation, commercial facilities, and many state and local government buildings. Depending on the project, other codes may also apply, including state accessibility standards and plumbing codes. That is why compliance should be viewed as a system, not a checklist of isolated measurements. The goal is true usability, supported by specific technical rules.
What are the most important ADA bathroom measurements to know?
Some of the most important ADA bathroom measurements involve maneuvering clearance, toilet placement, grab bars, and fixture heights. One of the foundational requirements is clear floor space that allows someone using a wheelchair to approach and use the fixture. In many accessible bathrooms, a turning space is required so a wheelchair user can rotate within the room, often provided by a 60-inch diameter turning circle or an equivalent T-shaped turning space.
For toilets, the centerline is typically required to be 16 to 18 inches from the adjacent side wall. The toilet seat height is generally 17 to 19 inches above the finished floor, measured to the top of the seat. Grab bars are also tightly regulated. The side wall grab bar and rear wall grab bar must be installed at specified lengths and locations, and they are usually mounted 33 to 36 inches above the finished floor. Those details matter because even small deviations can affect safe transfers and support.
Lavatories and sinks must provide knee and toe clearance underneath so a wheelchair user can roll forward. The rim or counter surface is typically limited to a maximum height of 34 inches above the finished floor. Faucets must be operable without tight grasping, pinching, or twisting of the wrist, which is why lever-operated, push-type, touch, or sensor faucets are commonly used in accessible restrooms.
Mirrors, dispensers, hand dryers, and other accessories also have reach range and mounting rules. For example, if a mirror is placed above a sink or counter, the bottom edge of the reflecting surface must be mounted low enough to be usable by both standing users and wheelchair users. These measurements are critical because accessibility depends on the entire user experience, not just the main plumbing fixtures.
Do all bathrooms in a commercial building have to be ADA compliant?
Not every single restroom element in every building is treated exactly the same way, but commercial and public facilities generally must provide accessible toilet rooms that comply with ADA standards. Whether all bathrooms must be accessible can depend on the type of building, whether it is new construction, an alteration, or an existing facility, and how many restrooms are provided. In new construction, accessibility obligations are usually broader and more exacting. In alterations, the altered area must typically comply to the maximum extent feasible.
If a facility has multiple restrooms, there are often scoping rules that determine how many must be accessible and what features each must include. For example, when multi-user restrooms are provided, accessible stalls, sinks, turning spaces, and accessories must be included. In some layouts, a single-user restroom may be used to help meet accessibility needs, but that does not automatically excuse noncompliance elsewhere if code requires accessible features in other toilet rooms as well.
Existing buildings can be more complicated. ADA obligations for existing facilities may involve barrier removal when it is readily achievable, meaning easily accomplishable without much difficulty or expense. That can include changes such as repositioning dispensers, replacing hardware, adjusting mirror heights, or installing compliant grab bars. More extensive structural modifications may depend on the scope of work and the legal standard that applies to the property.
Because the requirements vary by occupancy type, project type, and jurisdiction, owners and facility managers should avoid assumptions. A bathroom that seems functional may still violate accessibility rules if the stall is too narrow, the sink lacks knee clearance, or the door hardware is difficult to operate. Reviewing both federal ADA standards and applicable state or local codes is the safest approach.
What are the most common ADA bathroom compliance mistakes?
Some of the most common ADA bathroom mistakes are surprisingly small details that create major access barriers. One frequent issue is inadequate clear floor space. A restroom may technically contain the right fixtures, but trash cans, diaper stations, partitions, or poorly placed accessories can block wheelchair maneuvering room. Another common problem is incorrect mounting height for grab bars, mirrors, paper towel dispensers, soap dispensers, and hand dryers. If those elements are mounted too high or too far from the usable area, the restroom may fail compliance even if the main fixtures are properly installed.
Toilet compartment errors are also very common. These include incorrect stall width or depth, improper toilet centerline placement, doors that swing into required clearances, and grab bars installed at the wrong length or position. In many cases, contractors rely on assumptions or outdated rules instead of the exact dimensions required by the applicable standard. Even being off by an inch or two can create a violation.
Sinks regularly present compliance issues as well. Typical mistakes include insufficient knee clearance, exposed pipes without proper protection, countertops mounted too high, and faucet controls that require tight grasping or twisting. Door hardware and door maneuvering clearances are another trouble spot, especially in smaller restrooms where the door swing interferes with turning space or fixture access.
Signage is often overlooked, but it matters. Accessible restroom signs must meet rules for location, tactile characters, and Braille. A beautifully renovated restroom can still be noncompliant if the signage is incorrect or mounted improperly. The broader lesson is that ADA bathroom compliance depends on careful coordination between design, construction, fixture selection, and final installation. It is rarely one dramatic mistake; it is usually a series of small oversights that add up to a barrier.
How can owners, contractors, and facility managers make sure a bathroom meets ADA requirements?
The best way to make sure a bathroom meets ADA requirements is to address accessibility from the beginning of the project rather than trying to fix problems after installation. That starts with using the current applicable accessibility standards, reviewing any state or local requirements that may be stricter than federal rules, and incorporating compliance into the design documents. Architects and designers should lay out turning space, fixture clearances, and mounting heights early so plumbing, framing, partitions, and accessories all work together.
Contractors should not rely only on standard details or product assumptions. Field conditions can affect compliance, especially in renovations where wall thickness, existing plumbing locations, or door swing limitations create challenges. It is important to verify dimensions during construction, not just on paper. Measuring toilet centerlines, grab bar placement, sink heights, accessory mounting locations, and door clearances before final completion can prevent costly rework later.
Facility managers and owners should also think beyond initial construction. Bathrooms can drift out of compliance over time when accessories are relocated, replacement fixtures are installed incorrectly, or maintenance staff add bins, shelves, or equipment that block clearances. Periodic accessibility reviews are a smart way to catch issues before they lead to complaints, citations, or user frustration.
Finally, when there is uncertainty, it is wise to involve an accessibility specialist, code consultant, or experienced design professional. ADA bathroom requirements are technical, and the cost of getting them wrong can include renovation expenses, project delays, legal exposure, and reputational damage. More importantly, proper compliance creates a restroom that is genuinely usable for more people. That is the real purpose behind the rules, and it is why careful planning, measurement, and ongoing oversight matter so much.