Creating a wheelchair-friendly bathroom starts with one principle: every essential task must be safe, reachable, and comfortable from a seated position. In accessibility work, that means designing for clear floor space, transfer access, turning radius, wet-area safety, and controls that can be operated with limited strength or dexterity. A wheelchair-friendly bathroom is not simply a larger room with grab bars added at the end. It is a coordinated layout that supports bathing, toileting, grooming, storage, and emergency response without forcing awkward movements or unsafe improvisation.
This matters because the bathroom is where many home injuries happen, especially during transfers to the toilet or shower. I have walked through many homes where a client could enter the bathroom but could not close the door once inside, approach the sink without hitting cabinet fronts, or roll into the shower without crossing a high threshold. Small design mistakes create daily barriers. Good design removes them. For households planning long-term aging in place, recovering from surgery, or adapting a home for a permanent mobility disability, bathroom accessibility often affects independence more than any other room. This hub article covers the core decisions, technical standards, and practical tradeoffs involved in bathroom and bedroom accessibility, so you can plan improvements confidently and identify where specialist guidance is worth the cost.
Start with circulation, doorway width, and turning space
The foundation of a wheelchair-accessible bathroom is circulation. A user must be able to approach each fixture, turn, and exit without repeated back-and-fill maneuvers. In most remodels, the first measurement I check is door clear width. A nominal 32-inch door often delivers less usable clearance than people expect, while a 36-inch door typically gives a more workable opening for many manual and power wheelchairs. Pocket doors or outswing doors are common solutions when a narrow bathroom cannot accommodate an inswing door without blocking transfers or turning space.
Inside the room, an adequate turning circle is critical. Many designers use a 60-inch turning diameter as a practical benchmark, drawn from accessible design standards. That does not mean every bathroom must be a perfect square with an empty center; equivalent T-turn configurations can also work. What matters is real maneuvering space, not theoretical dimensions lost to vanity corners, toilet projections, or radiator covers. I recommend mapping the actual wheelchair footprint of the primary user, especially for power chairs with larger bases or elevated leg rests.
Approach clearance at fixtures matters just as much as center-floor turning space. A toilet that meets dimensional guidelines can still be unusable if the vanity is too close for a side transfer. A sink may have knee clearance but remain unreachable if the path to it is pinched by a linen cabinet. Good planning starts with fixture relationships, not isolated products.
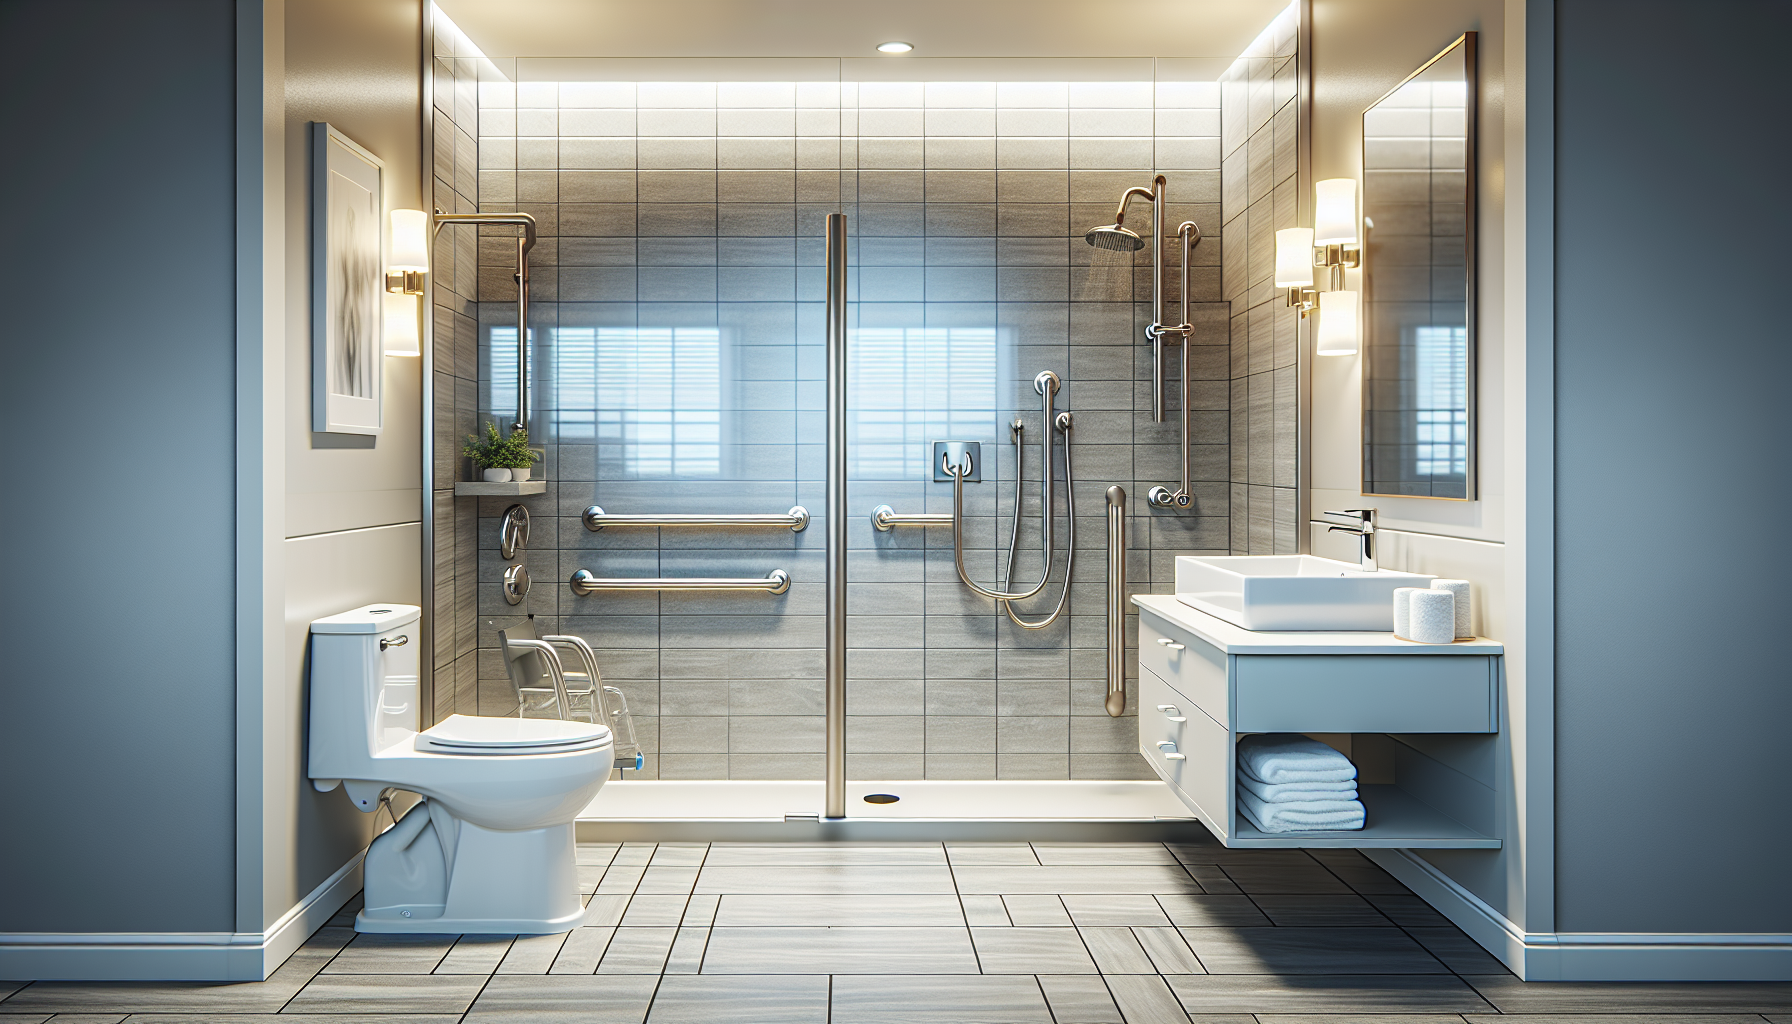
Design the shower for level access and safe transfers
The shower is usually the most important upgrade in a wheelchair-friendly bathroom. A curbless or low-threshold shower reduces trip risk and allows roll-in or assisted access. In practical terms, that means sloping the shower floor correctly to the drain while keeping the bathroom floor outside the wet area protected from splash and pooling. Linear drains can help because they simplify slope direction, though center drains can also work when installed carefully. Waterproofing is nonnegotiable; a failed membrane turns an accessibility remodel into a moisture and mold problem.
For users who remain in a wheelchair while bathing, a true roll-in shower needs enough interior depth to enter, turn, or position for assistance. For many households, a transfer shower with a built-in bench is the better fit, especially when space is limited and the user can transfer laterally. Fold-down seats are useful but should be attached to proper blocking, not just tile backer. Handheld showerheads on slide bars, pressure-balanced or thermostatic mixing valves, and controls located near the entrance reduce the need to reach through hot water to start the shower.
Slip resistance is another detail people underestimate. Small mosaic tile often performs better underfoot because the increased grout joints add traction, but grout maintenance becomes more demanding. Larger-format textured porcelain can also work if its wet dynamic coefficient of friction is suitable for bathroom use. Avoid polished stone. It looks upscale in a showroom and becomes dangerous in a wet transfer zone.
Choose the right toilet setup, grab bars, and support locations
Toilet access depends on seat height, side clearance, and stable support. Many wheelchair users do best with a comfort-height or ADA-height toilet, though individual transfer technique matters more than labels. A toilet that is too high can be as problematic as one that is too low, especially for users who rely on foot placement during transfers. Side-transfer access is usually the deciding factor. If the toilet is boxed into a tight alcove, adding bars will not solve the problem.
Grab bars should be selected and positioned based on transfer method, not installed generically. A horizontal side bar, rear bar, and vertical assist bar can each serve different users. I have seen clients strongly prefer a fold-up support arm on one side because it more closely mimics the support geometry of a wheelchair armrest during transfer. What always matters is structural backing. Bars mounted only into drywall anchors are unsafe and should never be treated as adequate.
Bidet seats deserve serious consideration in a wheelchair-friendly bathroom. For users with limited trunk rotation, shoulder mobility, or hand function, they can reduce dependence on caregivers and improve hygiene. Electrical requirements, outlet placement, and toilet rough-in dimensions should be reviewed before product selection. The best accessibility choices are often the ones that preserve privacy in everyday routines.
Build a sink and vanity that work from a seated position
An accessible sink needs knee and toe clearance, insulated or otherwise protected plumbing, reachable controls, and a mirror that works while seated. Wall-mounted sinks are often the simplest solution, but a carefully designed floating vanity can provide both access and storage. The trap and supply lines should not contact the user’s legs, and cabinet modifications should preserve enough depth for approach. Counter height is not one-size-fits-all. For some users, a slightly lower sink improves reach; for others, wheelchair armrest height or power-chair joystick location changes what is comfortable.
Faucets should be operable with minimal force. Lever handles are a reliable baseline, while touchless models can be excellent if the sensor range is tuned properly and the temperature control remains intuitive. Mirrors should extend low enough for seated use, and task lighting should reduce shadows at the face. If the bathroom serves someone who performs grooming, medication management, or skin checks while seated, lighting quality is not cosmetic; it is functional.
Storage is part of sink usability. Everyday items such as toothbrushes, incontinence supplies, grooming tools, and medications should sit within an accessible reach range. Deep base cabinets often waste space in accessible bathrooms because the front half is blocked by wheelchair approach requirements. Shallow drawers, pull-outs, side storage towers, and open shelving placed thoughtfully are usually more useful.
Use materials, controls, and lighting that reduce risk
Accessibility is heavily influenced by finishes and hardware. Flooring should be firm, stable, slip resistant, and easy to roll across. In bathrooms connected to accessible bedrooms, I aim for minimal transitions between rooms because even small lips can catch casters or become a nighttime trip hazard for caregivers. Luxury vinyl tile, textured porcelain, and sheet vinyl are common choices, each with tradeoffs in durability, seam management, and water resistance.
Door hardware should be operable with a closed fist. Lever handles outperform round knobs. Light switches, exhaust fan controls, and emergency call buttons need consistent placement within reachable height ranges. Motion-sensing night lighting is one of the most effective low-cost upgrades I recommend, particularly when a bedroom-to-bathroom route is used in the dark. Good layered lighting includes ambient, task, and night lighting, with attention to glare. Glossy tile and bright vanity fixtures can create reflections that make navigation harder for users with low vision.
Ventilation affects safety too. Bathrooms used for seated showering often stay damp longer, increasing slip risk and encouraging mildew if exhaust is weak. A properly sized fan, humidity control, and easy-to-clean surfaces keep the room healthier and easier to maintain. Accessibility that is hard to clean tends to degrade over time.
Plan the bathroom and bedroom together for real daily use
Because this page is the hub for bathroom and bedroom accessibility, it is important to treat the route between those spaces as part of one system. A wheelchair-friendly bathroom can still fail if the bedroom has narrow bedside clearance, high carpet resistance, or no place for dressing, transfers, and equipment charging. In many projects, the most meaningful improvement is not inside the bathroom itself but in the connection between bedroom, closet, and bath.
An accessible bedroom should provide usable space on at least one bed side for wheelchair approach and transfer, depending on the user’s preferred side and assistance needs. Bed height should align with wheelchair seat height as closely as practical. Ceiling lifts, portable floor lifts, or transfer poles may shape both bedroom and bathroom layouts. If continence care, nighttime toileting, or catheter management are part of the routine, storage and lighting must support those tasks discreetly and efficiently.
| Area | Common barrier | Better accessible solution |
|---|---|---|
| Bathroom entry | Narrow inswing door blocks wheelchair | 36-inch door, pocket door, or outswing door |
| Shower | Raised curb and fixed glass panel | Curbless entry with bench and handheld shower |
| Toilet zone | Tight alcove prevents side transfer | Open side clearance with reinforced grab bar walls |
| Sink | Deep vanity blocks knee space | Wall-mounted or floating sink with protected plumbing |
| Bedroom route | Thick carpet and poor night lighting | Low-resistance flooring and motion-activated lighting |
Closet accessibility also affects bathroom use. If clothing storage is too high, too deep, or obstructed by hinged doors, dressing may shift into the bathroom, where moisture and limited maneuvering space create new problems. Open sightlines, sliding doors, lower rods, and pull-down closet hardware often improve the whole routine. The best bathroom and bedroom accessibility plans are based on an actual morning and evening workflow, not just room-by-room checklists.
Know the standards, costs, and when to hire specialists
Accessible residential design often borrows from ADA concepts, but private homes are not automatically governed by the same requirements as public accommodations. That distinction matters. ADA guidance is still useful because it provides tested dimensions for turning, reach, clearances, and fixture relationships. In multifamily or federally funded housing, Fair Housing Act and ANSI A117.1 considerations may also apply. Local building codes, plumbing codes, electrical requirements, and permit rules always control the finished project, so verify assumptions with the authority having jurisdiction.
Costs vary widely by scope. A simple bathroom accessibility refresh with grab bars, lever hardware, better lighting, and a handheld shower may cost a few thousand dollars. A full wheelchair-friendly bathroom remodel involving layout changes, waterproofing, curbless shower construction, widened doors, tile work, electrical relocation, and structural backing can cost far more. If joists need modification to recess the shower floor, budget and engineering complexity increase. Product choices also matter: a basic wall-mounted sink costs far less than a custom floating vanity, and a standard bidet seat costs far less than a full smart toilet.
Specialists add value when the project involves complex mobility needs, skin protection concerns, caregiver assistance, bariatric requirements, or progressive conditions that may change equipment needs over time. Occupational therapists, certified aging-in-place specialists, accessibility-focused designers, and experienced remodelers can identify problems a general contractor may miss. I have seen expensive renovations fail because no one asked how the user actually transferred or whether a future power wheelchair would fit. A good assessment prevents costly rework.
A wheelchair-friendly bathroom is the result of careful planning, not a few accessories added after construction. The essentials are clear circulation, a workable door, level-access bathing, a toilet zone designed for the user’s transfer method, a sink that can be used comfortably while seated, and materials that reduce slipping and strain. When you connect those choices to the adjacent bedroom, closet, and nighttime route, accessibility becomes part of a daily routine that supports privacy, safety, and independence.
The main benefit is simple: a well-designed bathroom and bedroom setup lets people do more for themselves, with less risk and less fatigue. That improves quality of life for wheelchair users and reduces physical demands on family caregivers. If you are planning changes, start by measuring your current spaces, documenting daily obstacles, and consulting a qualified accessibility professional before demolition begins. The right plan will save money, prevent avoidable mistakes, and create a home that works better every day.
Frequently Asked Questions
What features make a bathroom truly wheelchair-friendly?
A truly wheelchair-friendly bathroom is designed so that every essential activity can be completed safely, comfortably, and independently from a seated position. That starts with adequate clear floor space and a layout that allows a wheelchair user to enter, turn, approach fixtures, and transfer without obstruction. In many cases, this means planning for a clear turning radius, wider doorways, and thoughtful placement of the toilet, sink, shower, and storage so movement feels natural rather than forced. Accessibility is not achieved by simply adding grab bars to a standard bathroom after the fact; the entire room should work as a coordinated system.
Key elements usually include a toilet with transfer space beside it, properly anchored grab bars, a sink that allows knee clearance underneath, faucets and controls that are easy to operate with limited hand strength, and a bathing area that can be used without stepping over a high threshold. A curbless or roll-in shower is often one of the most important upgrades because it reduces fall risk and improves access. Non-slip flooring, reachable mirrors, accessible lighting, and practical storage at seated height also matter. The goal is to create a bathroom where safety, reachability, and comfort are built into the layout from the beginning.
How much space is needed in a wheelchair-accessible bathroom?
Space needs depend on the user’s wheelchair size, transfer method, and whether a caregiver will assist, but generous maneuvering room is one of the most important requirements. A wheelchair user needs enough open floor area to enter the room, approach each fixture, and turn without hitting walls, cabinets, or doors. In most accessible bathroom designs, the layout must provide a clear turning area as well as approach space in front of the toilet, sink, and shower. Even if a room meets minimum code dimensions, it may still feel cramped in everyday use if the clear paths are interrupted by vanities, swinging doors, or poorly placed accessories.
Beyond the turning radius, transfer space is critical. The toilet typically needs open space to one side so the user can shift from the wheelchair to the seat safely. The sink should allow a forward approach, and the shower should provide enough room for entry, seating, and repositioning. If a caregiver will be helping, the room should include additional clearance around major fixtures. In practice, successful wheelchair-friendly bathrooms are planned around movement patterns, not just square footage. A smaller room can work if the layout is efficient, while a larger room can still fail if access is blocked or fixture placement is awkward.
What is the best shower design for a wheelchair-friendly bathroom?
For most wheelchair-friendly bathrooms, the best shower design is a curbless, roll-in, or low-threshold shower that eliminates the need to step over a barrier. This type of entry makes the shower safer and easier to use, especially for people who transfer from a wheelchair or use a shower chair. A properly designed accessible shower should include enough floor area for maneuvering, a slip-resistant surface, and drainage that prevents water from spreading into the rest of the bathroom. The shower controls should be placed where they can be reached from both outside and inside the showering area, which helps the user start the water without getting soaked or losing balance.
Seating and support are just as important as the entry itself. Many accessible showers include a built-in bench or a securely mounted fold-down seat, along with grab bars positioned for stability during transfers and bathing. A handheld showerhead on an adjustable slide bar adds flexibility and is much easier to use from a seated position than a fixed overhead shower alone. Thoughtful details such as anti-scald valves, easy-to-turn controls, recessed shelving within reach, and adequate lighting make a major difference in everyday comfort. The best shower design is one that supports safe access, easy control, and confident use without unnecessary strain.
How should the toilet and sink be set up for wheelchair access?
The toilet and sink should be positioned to support both approach and transfer. For the toilet, side transfer space is usually essential, allowing the wheelchair to pull up alongside the seat. Grab bars should be installed at the correct height and securely anchored to support body weight during transfers. Toilet height also matters, since a comfort-height or ADA-height toilet is often easier for many users to move onto and off of. Placement should allow enough room for the user’s feet, wheelchair footrests, and arm movement, while keeping toilet paper, flush controls, and hygiene items within easy reach.
For the sink, wheelchair access depends on knee and toe clearance underneath, as well as a counter height that can be used comfortably from a seated position. Exposed plumbing should be insulated or enclosed to prevent burns or bumps to the legs. Faucets should be easy to operate with limited dexterity, which is why lever handles, touch controls, or motion-activated fixtures are often preferred. Mirrors should be mounted low enough to be useful from a seated position, or tilted for visibility. Together, the toilet and sink should form part of a layout that allows smooth movement between grooming and toileting tasks, reducing strain and helping the user maintain independence.
What safety upgrades are most important in a wheelchair-friendly bathroom remodel?
The most important safety upgrades are the ones that reduce fall risk, improve transfer stability, and make every control easy to reach and operate. Slip-resistant flooring is one of the first priorities because wet bathroom surfaces can become hazardous quickly. Curbless shower entry, properly installed grab bars, and a stable shower seat are also high-value improvements because they directly affect daily bathing safety. Lighting should be bright and even, with minimal glare and shadows, so the user can clearly see floor transitions, controls, and edges. If the bathroom is used at night, layered lighting or motion-sensor night lights can add another level of protection.
Just as important are the smaller functional details that often get overlooked. Door hardware should be easy to grasp, and the doorway should allow smooth entry without tight squeezing or awkward turns. Faucets, flush mechanisms, shower valves, and storage should all be usable with limited strength or dexterity. Temperature control is another major safety issue, so anti-scald protection is highly recommended in showers and sinks. Finally, the remodel should be tailored to the individual, not just to a generic accessibility checklist. The safest wheelchair-friendly bathroom is one that reflects the user’s exact chair size, reach range, balance level, transfer style, and whether assistance is needed during daily routines.